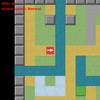
Sometimes, we want more than simply tiles we can either walk on or not. In this tutorial, we'll extend our array of floorTypes and tileTypes to accomodate some interesting new features to our maps. As in the previous lessons, you'll need to make sure you have the tilesheet PNG file for this lesson in the same folder as your HTML document.
We'll also modify the gameMap to include some of the new tiles:
var gameMap = [
	0, 0, 4, 0, 0, 0, 0, 0, 0, 0, 0, 0, 0, 0, 0, 0, 0, 0, 0, 0,
	0, 2, 4, 4, 1, 1, 1, 7, 7, 7, 1, 1, 1, 1, 1, 1, 0, 2, 2, 0,
	0, 2, 3, 4, 4, 1, 1, 9, 1, 1, 1, 1, 1, 1, 1, 1, 0, 2, 2, 0,
	0, 2, 3, 1, 4, 4, 1, 9, 2, 2, 2, 2, 1, 1, 2, 2, 2, 2, 2, 0,
	0, 2, 3, 1, 1, 4, 4, 9, 2, 3, 3, 2, 1, 1, 2, 1, 0, 0, 0, 0,
	0, 2, 2, 2, 2, 2, 2, 2, 2, 3, 3, 2, 2, 2, 2, 1, 1, 1, 1, 0,
	0, 5, 1, 1, 1, 2, 4, 1, 1, 1, 1, 6, 6, 6, 2, 1, 1, 1, 1, 0,
	0, 5, 5, 5, 5, 2, 4, 1, 1, 1, 1, 8, 1, 1, 2, 1, 1, 1, 1, 0,
	0, 1, 5, 1, 5, 2, 4, 4, 4, 4, 4, 8, 1, 1, 2, 2, 2, 2, 1, 0,
	0, 1, 5, 5, 5, 2, 3, 2, 1, 1, 4, 8, 1, 1, 1, 3, 3, 2, 1, 0,
	0, 1, 2, 2, 2, 2, 1, 2, 1, 1, 4, 1, 1, 1, 1, 1, 3, 2, 1, 0,
	0, 1, 2, 3, 3, 2, 1, 2, 1, 1, 4, 4, 4, 4, 4, 4, 4, 2, 4, 4,
	0, 1, 2, 3, 3, 2, 1, 2, 1, 1, 1, 1, 1, 1, 1, 1, 1, 2, 1, 0,
	0, 1, 2, 3, 4, 2, 2, 2, 1, 1, 1, 1, 1, 1, 1, 0, 1, 2, 1, 0,
	0, 3, 2, 3, 4, 4, 1, 2, 2, 2, 2, 2, 2, 2, 1, 0, 1, 2, 1, 0,
	0, 3, 2, 3, 4, 4, 3, 2, 1, 1, 1, 1, 1, 2, 1, 1, 1, 2, 3, 0,
	0, 3, 2, 3, 4, 1, 3, 2, 1, 3, 1, 1, 1, 2, 1, 1, 1, 2, 3, 0,
	0, 1, 2, 2, 2, 2, 2, 2, 3, 3, 3, 1, 1, 2, 2, 2, 2, 2, 3, 0,
	0, 1, 1, 1, 1, 1, 1, 3, 3, 3, 3, 3, 1, 1, 1, 1, 1, 1, 4, 0,
	0, 0, 0, 0, 0, 0, 0, 0, 0, 0, 0, 0, 0, 0, 0, 0, 0, 0, 0, 0
];
We will now be modifying the floorTypes array to contain 5 new entries: ice, conveyorL, conveyorR, conveyorU, and conveyorD. Ice will be a slippery surface on which Characters won't be able to stop themselves sliding along until they either leave the ice or hit something solid, and the Conveyor tiles will be able to take Characters (involuntarily) in their corresponding direction; "up" for "conveyorU", "right" for "conveyorR", etc.
var floorTypes = {
	solid	: 0,
	path	: 1,
	water	: 2,
	ice		: 3,
	conveyorU	: 4,
	conveyorD	: 5,
	conveyorL	: 6,
	conveyorR	: 7
};

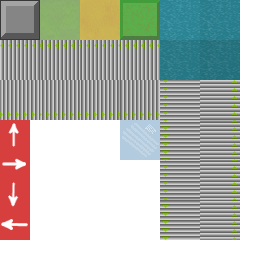
We'll also add the following entries to the tileTypes array, which is the information for our new tiles. Our conveyor tiles will have multiple frames for their sprite properties to give them an animated effect:
	5 : { colour:"#eeeeff", floor:floorTypes.ice,	sprite:[{x:120,y:120,w:40,h:40}]},
	6 : { colour:"#cccccc", floor:floorTypes.conveyorL,	sprite:[
			{x:0,y:40,w:40,h:40,d:200}, {x:40,y:40,w:40,h:40,d:200},
			{x:80,y:40,w:40,h:40,d:200}, {x:120,y:40,w:40,h:40,d:200}
		]},
	7 : { colour:"#cccccc", floor:floorTypes.conveyorR,	sprite:[
			{x:120,y:80,w:40,h:40,d:200}, {x:80,y:80,w:40,h:40,d:200},
			{x:40,y:80,w:40,h:40,d:200}, {x:0,y:80,w:40,h:40,d:200}
		]},
	8 : { colour:"#cccccc", floor:floorTypes.conveyorD,	sprite:[
			{x:160,y:200,w:40,h:40,d:200}, {x:160,y:160,w:40,h:40,d:200},
			{x:160,y:120,w:40,h:40,d:200}, {x:160,y:80,w:40,h:40,d:200}
		]},
	9 : { colour:"#cccccc", floor:floorTypes.conveyorU,	sprite:[
			{x:200,y:80,w:40,h:40,d:200}, {x:200,y:120,w:40,h:40,d:200},
			{x:200,y:160,w:40,h:40,d:200}, {x:200,y:200,w:40,h:40,d:200}
		]}
Implementing effects on Character movement
We now have to extend our Character class by modifying the processMovement method. Previously, when the movement tile equalled or exceeded the Character delayMove property, we called the placeAt method and were done. We'll now run some more code inside this if statement after the placeAt method to see if the Character is on an active tile.
We start by setting a temporary variable as a reference to the floorType of the map tile the Character is currently standing on:
var tileFloor = tileTypes[gameMap[toIndex(this.tileFrom[0], this.tileFrom[1])]].floor;
Now we'll do some checks to see if we're standing on an active tile (ice or conveyor). First, if the Character is on an Ice tile, we want to see if they can keep moving in the same direction using a new canMoveDirection method we'll be creating in a minute. If so, we keep the Character moving in its current direction using another new method, moveDirection:
		if(tileFloor==floorTypes.ice)
		{
			if(this.canMoveDirection(this.direction))
			{
				this.moveDirection(this.direction, t);
			}
		}
Think of it like this: you're walking briskly along, and suddenly step onto a very slippery surface. Your momentum causes you to continue sliding along in the direction you were headed, with nothing to stop you, until you hit that unfortunately placed telegraph pole!
We'll also check for each of the Conveyor floorTypes. With the conveyors, however, we'll see if the Character can move in the direction of the conveyor (left for conveyorL, etc.), and if so move them:
		else if(tileFloor==floorTypes.conveyorL && this.canMoveLeft())	{ this.moveLeft(t); }
		else if(tileFloor==floorTypes.conveyorR && this.canMoveRight()) { this.moveRight(t); }
		else if(tileFloor==floorTypes.conveyorU && this.canMoveUp())	{ this.moveUp(t); }
		else if(tileFloor==floorTypes.conveyorD && this.canMoveDown())	{ this.moveDown(t); }
We also need to modify the check in the Character canMoveTo method; we now don't just check to see if the target floorType is not path, but now check it's not one of the following: path, ice, conveyorL, conveyorR, conveyorU, or conveyorD:
	if(tileTypes[gameMap[toIndex(x,y)]].floor!=floorTypes.path &&
		tileTypes[gameMap[toIndex(x,y)]].floor!=floorTypes.ice &&
		tileTypes[gameMap[toIndex(x,y)]].floor!=floorTypes.conveyorU &&
		tileTypes[gameMap[toIndex(x,y)]].floor!=floorTypes.conveyorD &&
		tileTypes[gameMap[toIndex(x,y)]].floor!=floorTypes.conveyorL &&
		tileTypes[gameMap[toIndex(x,y)]].floor!=floorTypes.conveyorR) { return false; }
New Character methods
We'll now add the new Character methods. First of all, the canMoveDirection function. This simply takes a direction value as an argument, and uses a switch statement to call the corresponding canMoveUp, canMoveDown, canMoveLeft or canMoveRight method and return its result:
Character.prototype.canMoveDirection = function(d) {
	switch(d)
	{
		case directions.up:
			return this.canMoveUp();
		case directions.down:
			return this.canMoveDown();
		case directions.left:
			return this.canMoveLeft();
		default:
			return this.canMoveRight();
	}
};
These new methods are really just to stop the need for repeating large chunks of code, and to improve code readability. We'll also add a moveDirection method, which will take a directions value and the game time as its arguments, and call the corresponding moveUp, moveDown, moveLeft, or moveRight function:
Character.prototype.moveDirection = function(d, t) {
	switch(d)
	{
		case directions.up:
			return this.moveUp(t);
		case directions.down:
			return this.moveDown(t);
		case directions.left:
			return this.moveLeft(t);
		default:
			return this.moveRight(t);
	}
};
Save your HTML document and try it out! Step on to the new tiles and see what happens!